What's worse?

What could be worse than a Space Marine Legion that fell to the Chaos powers and rebelled against everything they once respected? We don't know, but it was probably pretty bad.


Wednesday, April 21, 2010

Warlord Titan Update 1


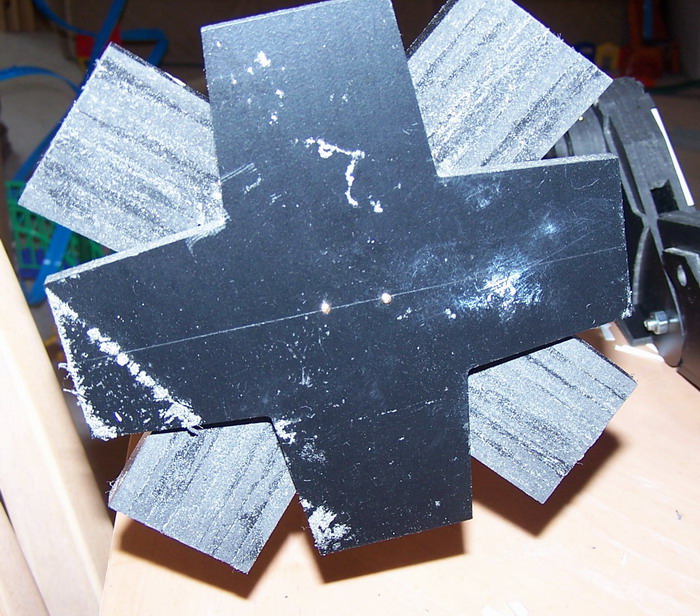
I've done some work on my new Warlord Titan. The changes were both structural reinforcements and cosmetic. I've decided to put pictures online for anyone else with one of these so they might get some ideas for their own. The above picture shows the underside of a foot. The dots are 0.75" brass nails (called extrusion pins). I've drilled up into the ankle pieces. If I didn't do that a sideways bump could take the feet right off.

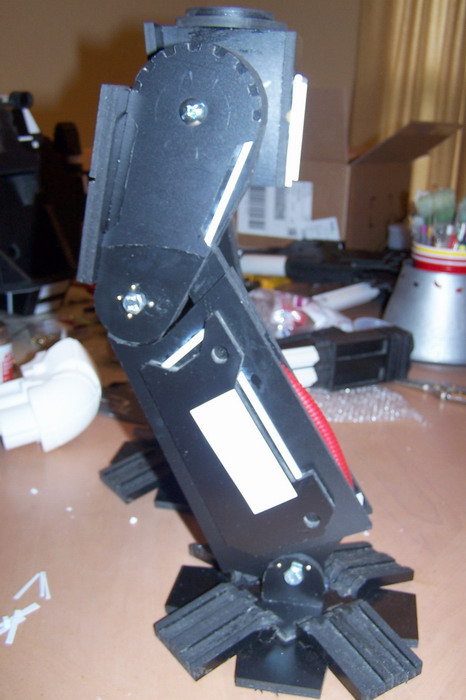
Above are the legs. You can see two more brass nails on the side of the ankle and four on the knee. I've added two pieces of square plastic tube to the backs of the trim pieces on both the thigh and calf. The piece on the top of the calf portion is a rod. Adding those pieces immediately took the look of the legs from kind of bland to very cool. I would highly suggest everyone to do that.

Here are the backs of the legs and hips. There are brass nails going through the black sintra and into the PVC pipe as shown and on the front as well. You can't see it here, but the white plastic card covers the area where I used two very large drywall screws to go through the back sintra piece and into the PVC pipe as well. Before I did this his torso would spontaneously lean forward.
I've drilled from the top hip piece so a long bolt (1/4-20) could reach all the way through the hip PVC pipe into the crotch torso box. This allowed me to bolt all the way through.
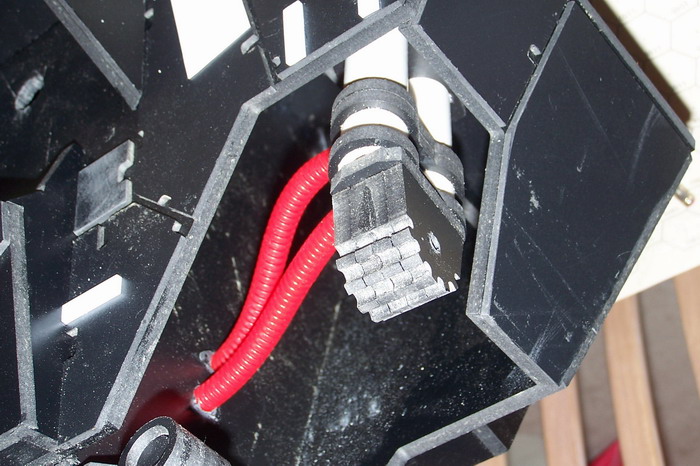
You can see that I put some 0.5" car wire channel tube in the open area of the back calf muscle as well as a small piece of plastic rod. It really improved the look (looks better in person).

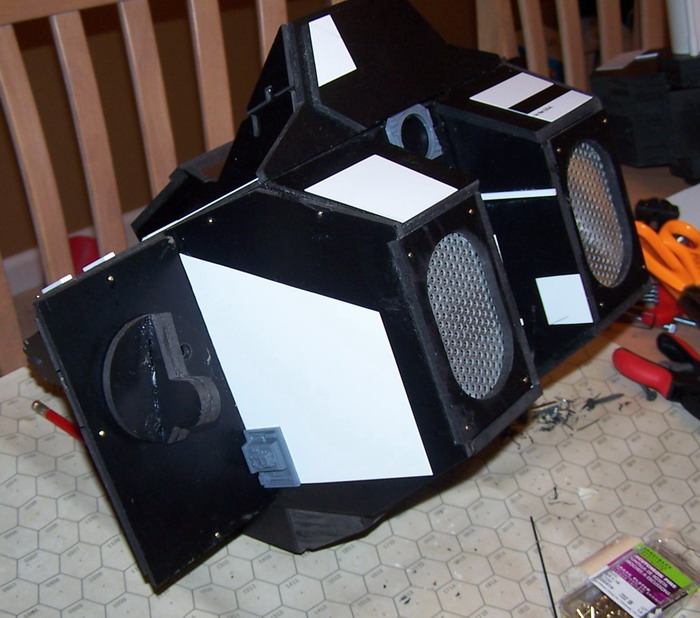
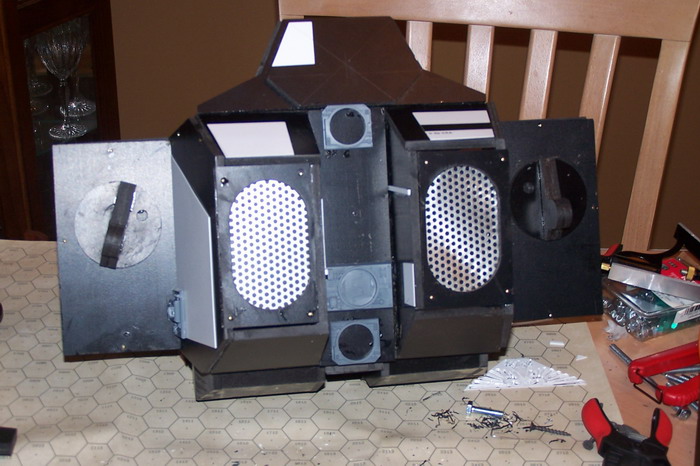
These are the Apocalypse Launchers with their doors open. There isn't an area for these doors to attach so I had to put in a 3/16" plastic tube. Worked like a charm.

The Quake Cannon had a big, featureless portion, so I put some card and plastic strips on to break it up a bit.

Here's the big change. The weapons were originally held on the elbows with a drywall screw going into a very small hole on the elbow. Instead I've tapped the elbow to fit my favorite bolts. I think it'll go quicker too.
As you can see, I've used some more plastic automobile tube. The texture is very common on the Armorcast titans, so I think it helps keep things a little more consistent.

Lots more plastic card to add some detail.

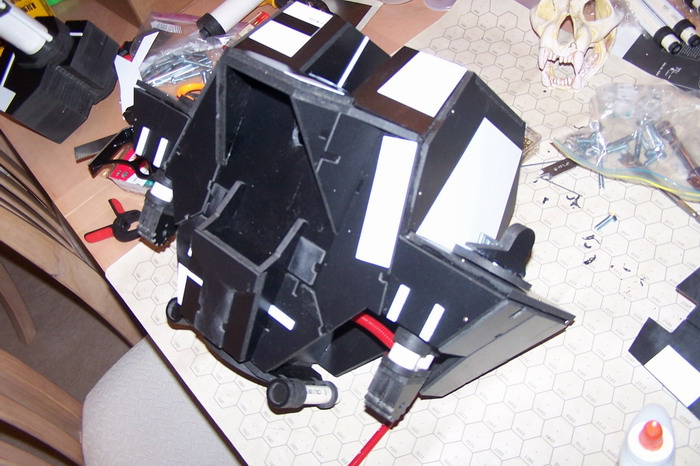
I used the back of one of the Bastion's weapon mounts as a control panel. You can also see a lot more reinforcing brass nails. Many of these were required to prevent the pieces from coming apart. They flexed and cracked quite a few times before I did this.

The "view from the top" shows some of the detail that I put between the exhaust stacks. The middle part is the Bastion escape hatch while the other two are weapon mounts (the backs being used as the control panels (as mentioned above).
You can also see the acrylic Aquila (Imperial Eagle). This and a smaller one are going to get pins on their backs so they can be removed when in Chaos Mode.
I hope to get it primed over the weekend. I've purchased some automobile spray primer which I've heard works well on this material. Let me know what you think!

Thursday, April 15, 2010

New Member of the Titan Team


Finally got this new guy put together today and I wanted to show him off. He's still got a long way to go until he's finished, but he's still pretty great! Above you see him in his full close-ranged Chaos glory.

Here he is as a long-range Imperial war machine: Darn that white resin head! Ah well, he'll be primed soon enough. I have decided to paint it so it can be switched between Chaos and Imperial. I'm thinking that it would look nice blue.


Can't wait to see it partnered with my other warlord!

MJ;-) PROJECT LOG: Secret Revealed!

Over the last few weeks that we've been rolling out the DFIR blog, I have dropped subtle (and sometimes not so subtle) hints that I'm working on a new project - my "Secret Project."

The time has come to reveal this effort, and bring it out of the obscurity of secretiveness.

I present to you...


LOGAN GRIMNAR AND HIS WOLFWING HUNTERS!!!

(cue cheers and raucous celebration here)


Ever since the new Space Wolves codex came out, I've been pouring over it way too much. Thinking, scheming, wondering, jotting down scribbly notes, re-reading, and generally being excited about a new codex for the first time in a long time. And I mean a LONNNGGGGG time...

I finally decided a few things about this project early in the year, so set to work putting my scheming into action.

First, I wanted to get off as cheaply as possible. This meant doing two things. One, requisitioning several of my existing models from other armies. Primarily two Land Raiders and two Dreadnoughts that used to be part of a Dark Angels/Deathwing army (but more recently have either collected dust and/or been used by my Black Legion). Two, relying on other unassembled miniatures I had lying around, primarily my Black Reach Terminators.

Second, by saving a bit up front, I wanted to splurge a little and treat myself to a few "upgrades" to the force. My "splurges" consist of a set of RESIN BASES FROM DRAGON FORGE MINIATURES, and a set of Terminators from the Space Hulk board game. Although the resin bases are from the Dragon Forge Parched Earth series, I think I can paint them up fairly nicely to represent cracked ice/glacier and snow. The resin bases were definitely a splurge on my part; however, the Space Hulk Terminators really turned out to be a bargain. I found an ebay store (pfc.games) that was selling a few sets of the 11 terminators AND the librarian for the wonderful price of $65. Not bad considering it net me a total of 12 terminators which would otherwise cost me over $100 MSRP at $50 per box of Terminators.

All told, the army currently consists of quite a bit. Logan Grimnar and Njal Stormcaller are the commanders. 25 Wolf Guard in Terminator Armor are the Troops (10 Black Reach Terminators, 5 Wolf Guard Terminators, and 10 Space Hulk Terminators). There's the aforementioned Land Raider, Land Raider Crusader, and Two Dreadnoughts, plus an additional Black Reach Dreadnought to support them. And Finally, 3 CNC Workshop Troop Landers (Drop Pods for Dreadnoughts) and 2 Games Workshop Drop Pods (for Terminators) round out the lot.

If the Techshop in Durham ever reopens, and DFIR poster MattP is able to get some time in there, Logan's Wolfwing will eventually add a nice Thunderhawk to their arsenal. ;-)

So all told, it was a fairly "budget" force - at least as budgetey as a 40k army can be.

$20 Logan (from Hangar 18 Hobbies in Cary)
$20 Njal (from Game Theory in Raleigh)
$50 Wolf Guard Terminators (from Hangar 18 Hobbies in Cary)
$12.50 Second set of AoBR Terminators (pfc.games on ebay)
$15 AoBR Dreadnought (pfc.games; they seem to be out of these currently)
$65 Space Hulk Terminators (pfc.games; they seem to be out of these currently)
$60 Resin Bases (Dragon Forge)
$0 Everything else I already had

I already have a few more Wolfwing Project Logs cued up in my brain, so expect a few more posts from me in short order!

Monday, April 12, 2010

PRODUCT REVIEW: Dragon Forge Resin Bases


Today I want to tell you about resin bases I recently purchased from Dragon Forge. I am fairly new to the whole world of resin. My first encounter with resin products was in the form of a bunch of bike bases produced by our very own DFIR poster MikeT. I've also dabbled in the realm of Forgeworld products, having utilized their Rhino Spaced Extra Armor, Deathguard Plague Marines Upgrade Pack, and Deathguard Terminators Upgrade Pack.


But as I began to formulate my latest SECRET project, I was trolling around the internet to add some unique flavor that really fit the theme of the force. That's when I happened across the Dragon Forge site, and their Parched Earth series of bases. My SECRET project does not involve a parched earth theme, but one of those light bulbs lit-up above my head as I looked at these, and I realized that I could make them match my new army's theme by painting them a certain way.

Looking at some other resin base vendors for a price comparison, it seemed like Dragon Forge's products were very reasonably priced in line with other similar products, and even lower than several of the sites I looked at.

So I was sold. I ordered up what I needed - some 40mm (seen above) and 60 mm bases (shown here), as well as some "Hero Bases" (seen at top of this post). Dragon Forge has a deal that you receive $5 of free product for every $30 you spend. Turns out the 60mm ones are exactly $5, so perfect, FREE 60mm base for me!

I received the products extremely fast. I believe I ordered the bases on a Wednesday or Thursday evening, and they were in my mailbox a few days later on Monday. Sweet!

Unfortunately, mistakes happen, and it turns out I received 25mm bases instead of the 40mm ones I had ordered. So I emailed Dragon Forge about this, and if I thought the shipping was fast, the email response was almost instantaneous! Jeff sincerely apologized for the mix up and said he'd get the right sized ones out immediately, and he gave me the option of returning the wrong-sized ones or not. I'm too nice of a guy (I hope), so wasn't going to stick somebody w/ a loss like that - resin is not cheap (according to MikeT and MattP here at DFIR). So I asked Jeff if I could keep 5 of the 25mm bases to use as themed objective markers and return the rest. Jeff's response was "Keep a whole set [of 10]! Its the least I can do." Awesome. That's customer service. Mistakes happen - what sets good vendors apart from bad ones is their customer care.

Within another couple of days (by week's end), I had the correct size bases.

Now, with product in hand, it was time to break those bad boys out and wash them up and use them. I inspected the bases, and was impressed by several things. First, the resin used was very sturdy, yet very lightweight, surprisingly lightweight. Second, the detail on the top surface was excellent. All five of the 40mm bases in a set are different, giving a good range of variety yet all tied-together with the themed uniformity. Third, the only air bubbles (voids) I could see were on the bottom of the bases, and only a couple of the bases had a handful (or less) of voids. These bases are very well crafted.

All in all, I have to give Dragon Forge an A++ for their bases. Selection (ie., variety) was great. Ordering was easy (online shopping cart with PayPal payment). Shipping was fast. Communication was very quick. Customer Service was OUTSTANDING. And the products themselves are excellent, both in quality and in craftsmanship.

The next time my project calls for some great resin bases, I will not have to troll all over the interwebs to find what I need, I'll just go to Dragon Forge directly and know that I'll be satisfied once again.

Thanks for the excellent bases, Jeff.

Thursday, April 8, 2010

Update: Scratch-Built Thunderhawk


I've decided to sell my scratch-built Thunderhawk. I really need to raise funds for other projects and this model will hopefully cover those.

Check it out here:
http://cgi.ebay.com/ws/eBayISAPI.dll?ViewItem&item=320514351106

Thanks!

Matt

Tuesday, April 6, 2010

Inserted Into Imperial Records


AKA "The Stormraven Retcon"
I got the Blood Angel book over the weekend. It's all sorts of crazy. As fellow DFIR poster MJ did with the missions book, I'm going to avoid reviewing it since you can find reviews all over the web.
What I would like to talk about is the background.
I want to start this off by talking about the Stormraven. Here's this brand-new invention so new that there isn't even a sketch of it in the book, yet it is pretty much shoved down our throats in the background sections. The poor Thunderhawk is mentioned about 10% as often as this new flyer. Nearly every story in the book talks about the Stormraven. The Land Raider, which the book mentions that the Blood Angels have in excess, is hardly ever used in a story. Their Land Raiders CAN DEEP STRIKE and yet there was no noteworthy occurrence of this maneuver ever being performed.
"Maybe I'm just being forgetful," I thought. I grabbed my 1996 "Angels of Death" codex off of the shelf. This is the book that first really introduced us to the Blood Angels and Dark Angels as we know them now. The above Dante miniature was put out for this book as were Mephiston and most of the other special characters. I read through the BA section and you know what? No mention of the Stormraven anywhere.
So it's obvious that the new flyer is so exciting that every story written for this book is going to include it as the transport mode of choice. I was feeling quite frustrated about this until I thought about the timeline that is in the codex. It starts at 746.M41 and goes until 999.M41. That's 253 years. Dante probably has t-shirts older than that. I like to read these time lines to get a sense of the history of a chapter, but 253 years is more like current events. Yes, in that time there have been two Armageddon wars and the whole Cadian Gate-Eye of Terror conflict but the chapter has been a codex chapter for almost 10,000 years. Nothing else exciting happened before then?
Now I feel less disappointed about the Stormraven being shoved into the background (it truly is the newest and fanciest thing that the chapter has had for the past 250 years) and am feeling the loss of the depth of the background of the chapter as a whole.
What do you guys think?
For the codex itself, it reads a lot like a fan-made codex. There are so many exceptions to the rule(s). They've got their own avatar (without the Daemon special rule). Their Jump Pack squads don't scatter like everyone else's. Their Land Raiders can Deep Strike. All Rhino-chassis tanks are Fast. It's seriously powerful. I'm just glad that they didn't go the extra step and give the Land Raiders and Stormravens the Drop Pod "adjusted scatter" rule for Deep Striking.
Here's going to be a fun argument: The Stormraven's ability to drop units off while moving says that they don't have to roll for Dangerous Terrain unless they actually land in Dangerous Terrain. The trick is that they should roll Dangerous Terrain if they land in Difficult Terrain, since it is a Deep Strike. How many players are going to tell you that they are immune to that test?

Friday, April 2, 2010

Plaguereaper Project: Part 1

Although fellow DFIR poster MattP is our resident Apocalypse guru, I thought I'd share my recent (and first) attempt at something truly "apocalyptic." In all of our past Apocalypse battles (which can be checked out at Apoc-Eclipse), I had plenty of models to field a large force including several Legendary Formations. However, the only time I've fielded any Super Heavies was when they were borrowed from MattP.

Time to change that.

I was ecstatic when I received a Baneblade kit for Christmas. Kudos to my wife's family (Bob, Martha, and Kaitlin) for feeding my 40k addiction. On a side note, I should point out that they have always fed my little addiction during gift-giving occasions, but this was the first time they got me the item I had put on my wishlist, instead of a gift certificate. THAT'S SOME TRUE LOVE!

Anyhoo...

Not having an Imperial army, there was no question that this "Baneblade" was destined for greater things in the service of the Dark Lords. Given that I was also working on a Deathguard army, it was also a no-brainer that this was to become a PLAGUEREAPER (featured in the main Apocalypse rulebook), dedicated to Father Nurgle and all of his pestilent ways.

Opening a Super Heavy kit for the first time was rather daunting, to say the least. Half a dozen sprues just chock full o' parts. Thank God it came with an instruction booklet; to bad said instructions were very detailed and somewhat complex. But that was just first appearances; in the end, the thing went together smoothly, nicely, and very easily.


Here's a shot of the project during the early stages (beer label pointed away from camera to protect the innocent...). At this point, I was working on assembling the two sides consisting of the track housings and tracks.

Discussions with MattP indicated that I could go beyond the basic Plaguereaper datasheet, such as adding extra side sponsons (like an Imperial Baneblade can). So I decided early on that I would do just that, mounting sponsons on the front and rear of the three side panels. I also decided to add a Havoc Launcher to the turret. Seriously, can a Super Heavy Tank have TOO many guns? I don't think so...

In hindsight, the whole process of building the baneblade kit was rather easy, but I believe that this early stage of building the two sides was the most time consuming. Once those were complete (couple nights worth of working on them, maybe 3 hours total), the rest of the kit went together very quick (probably another couple of nights, 3 or so hours).


So all in all, it went together nicely, as you can see above. Once the basic kit was completed, though, it was time to sufficiently "Nurgle-it-up." I had a few thoughts about this part of the project. Primarily, I did not like the look of the Pus Tanks as depicted in the Apocalypse rulebook - large, open vats mounted on the sides of the tank hull.

In essence, I had several personal problems with that look. First, the open tanks. Drive over your first hill slope or bump in the battlefield and all your "ammo" is spilled-out onto the ground. Second was the pipes that feed the turret's pus cannon. What happens when the turret rotates? Expanding pipes? OK, so maybe I'm thinking too much about real life physics and mechanics for a game set in the 41st millennium and based on various races that span the galaxy...

Practically (and primarily) , though, I figured my infantile converting skills just really weren't up to the task of hacking off part of my model to put the tanks in - not to mention that it'd take away precious space where I was mounting extra sponsons!

Searching at the Papa Nurgle forums, I turned up THIS idea of how to take care of my problems with the Pus Tanks (see second post down). Thanks, Mabrothrax!!!

The other primary thought I had was to make this Plaguereaper appear to be more of a "new addition" to the Deathguard's arsenal. Not some antiquated thing all rusted and cantankerous, but something representing a "recent fall" from the graces of the Imperium. In other words, I wasn't as keen on "Nurgling-it-up" as much as Mabrothrax's Plaguereaper seen HERE (see second-to-last post on that page).

So, here's what I came up with.

1. Mildly scar up the tank to represent battle damage, and add some greenstuff (but not a lot) to create Nurgle pustules and growths to the tank. This was done with a variety of tools. Pin vice with a couple different sized drill bits to make shell holes. X-acto knife to run some 'cuts' along pieces. And the corner of a flat head screwdriver to "scratch-up" other parts. Obviously green stuff, which was sculpted with a chopstick tip (pretty much the only GS sculpting tool I've ever needed).


2. Use barrels on the back of the turret for the Pus Tanks. I used the bendy parts of several drink box straws to feed the turret (any parent with a small child will have drink box straws in spades). I used drink box straws because their smaller diameter was more in line with the scale of this tank. These were attached with green stuff.
[Side note: I took a close-up of the barrels, but managed to leave it on the wrong computer - I'll add that pic in the Part 2 update (which will cover the painting of this thing). You can kind of see them below, but not all that well. Sorry...] ;-(


3. I also swapped the lascannon barrel ends with the Chaos gorgon head gun barrels. I didn't have enough to do all the heavy bolters, so just did the twin-linked heavy bolter mounted on a mini-turret on the front (see above).

4. Add some growth to the main pus cannon barrel, but again, not to much. So as not to use up to much of my green stuff, I used an air-hardening "porcelain" clay product (the white). I rolled this out into a long sausage and simply spiraled it down the barrel from turret towards end. I also ran a second roll and spiraled it the opposite way. I added a little more of the white clay where the barrel connects to the turret and molded that into one mass - trying to go for a large growth at the turret end that is slowly snaking its way up the barrel. Finally, I did a long sausage of green stuff, but before sprialing it down the barrel like the white porcelain clay, I "twisted" the green stuff log to give it even more texture.


And there you have it. Construction of a Plaguereaper! This weekend will feature some very nice weather AND at least enough time to get this thing primed. I'll post a Part 2 in a week or so when I have the thing completed (painting Nurgle-themed stuff is easy-schmeesy - see THIS post for details.)

Happy Easter everyone! Hopefully you are NOT like me and actually have today off... ;-)